Archiv des Autors: ckuehnel

Avatar von Unbekannt

Über ckuehnel

Mein aktuelles Profil ist unter https://www.linkedin.com/in/ckuehnel zu finden.

Oxocard Connect

In meinem Blogbeitrag Vermittlung digitaler Inhalte in der Schule hatte ich die das Informatikinteresse an den Schulen fördernden Mikrocontroller BBC micro:bit, Calliope mini, und Oxocard betrachtet.

Dieser Bereich ist nach wie vor in Bewegung, stellt doch die Digitalisierung in allen Lebensbereichen eine grosse Herausforderung dar.

Mit der Oxocard Mini Serie stellt die Schweizer Oxon AG Computerboards zur Verfügung, die das Eintauchen in Computergrafik und ihre zugrunde liegenden Algorithmen oder Spiele und Animationen mit ihren Quelltexten ermöglichen.

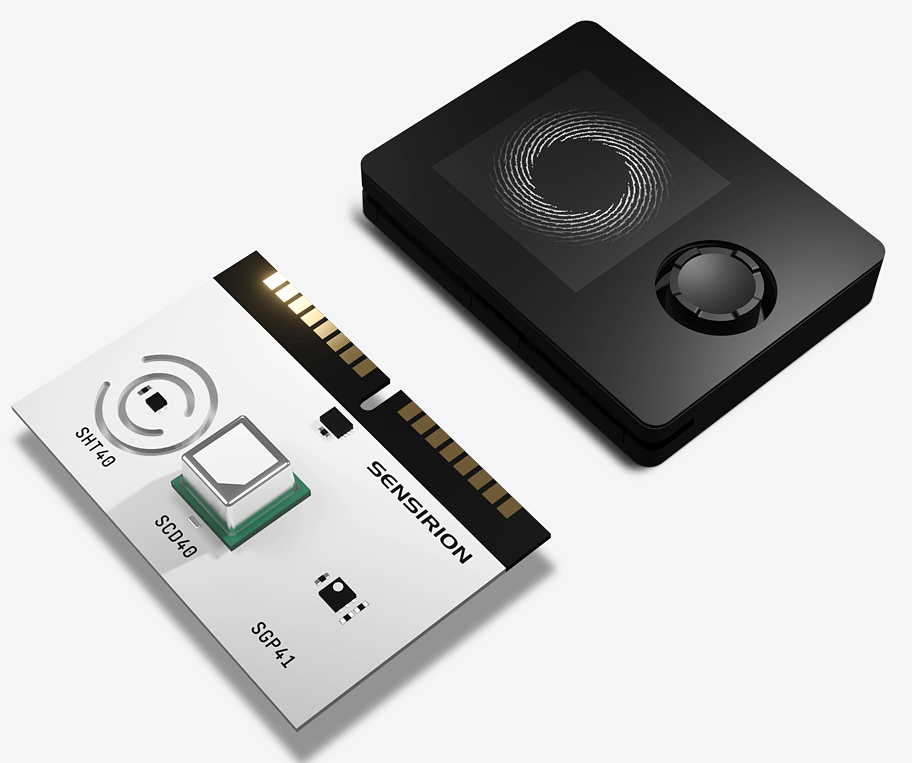
OxoCard (Mini) Science ist eine programmierbare Multisensorplatine, die mit Hilfe von sieben Sensoren die folgenden physikalischen Grössen erfasst: Licht/IR, Temperatur, Geräusche, Feuchte, Druck und flüchtige Kohlenstoffverbindungen (VoC, eCO2 und Ethanol). Auch hier steht der dokumentierte Quelltext zur Verfügung und eigene Experimente können gestartet werden.

Oxocard Science, Oxocard Galaxy & Oxocard Artwork

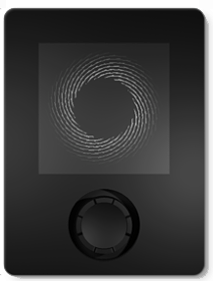
Das jüngste Kind der Oxocard-Familie ist Oxocard Connect – ein ebenfalls auf dem ESP32 aufbauendes und damit netzwerktaugliches Computermodul mit grafischem TFT-Display und einem Joystick für die Benutzer-Eingaben, welches durch seitlich einsteckbare Cartridges mit peripheren Komponenten, wie Sensoren etc., erweitert werden kann.

Oxocard Connect mit Air Cartridge

Die Programmierung kann wieder über den komfortablen Nanopy-Editor erfolgen. Zahlreiche Programmbeispiele und ausführliche Erläuterungen dienen der Einarbeitung und Auseinandersetzung mit diesem System. Zum näheren Kennenlernen möchte ich Sie auf den Beitrag von David Lee verweisen.

Ich möchte Oxocard Connect nicht mit Python programmieren, sondern diesen sehr ansprechend gestaltetem Controller mit der Arduino-IDE programmieren. Die zahlreichen Libraries ermöglichen die Erweiterung mit Sensoren und die Vernetzung sehr komfortabel. Mit dem Veroboard lassen sich Prototypen sehr einfach erstellen, bevor man mglw. eine anwendungsspezifische Cartridge erstellt.

Oxocard Connect Arduino Test

Für die Hardware-Konstellation habe ich ein Testprogramm erstellt, welches die folgenden Funktionen testet:

  • Ausgabe auf dem farbigen TFT-LCD mit 240 x 240 Pixel LH133T-IG01 mit ST7789VW LCD-Controller
  • Abfrage Joystick
  • LEDs über digitale IO
  • EEPROM über I2C-Bus

Auf der Cartridge stehen neben digitaler und analoger IO und I2C-Bus auch noch SPI zur Verfügung. Ausserdem kann die gesamte Schaltung auch extern mit 5V (VEXT) versorgt werden.

Der Einsatz eines so ansprechend gestalteten Controllers lässt schnell das oft vorhandene Drahtverhau mit seinen unsicheren Verbindungen vergessen.


Oxocard Connect Openweather Station

Oxocard Connect besitzt mit der vorhandenen Hardware alle Möglichkeiten, über das Internet auf Daten zuzugreifen und diese auf dem Display darzustellen.

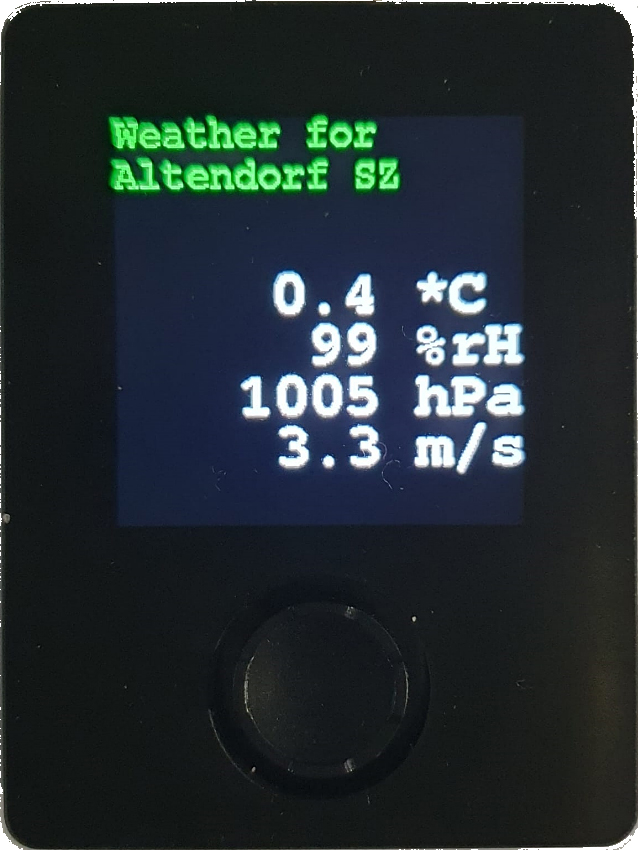
Ich habe hier durch Abfrage der Wetterdaten von Openweathermap.org eine kleine Wetterstation als Anwendungsbeispiel erstellt.

Openweathermap.org stellt maximal 1000 Aufrufe pro Tag gratis zur Verfügung, weshalb hier der Abfragezyklus auf zwei Minuten eingestellt wurde. Werden die 1000 Aufrufe überschritten, dann kann ein blockierter Account die Folge sein.

Das Programm finden Sie auf GitHub unter https://github.com/ckuehnel/Arduino2023/tree/main/ESP32/Oxocard/Oxocard_OpenWeather


Oxocard Connect MQTT-Client

Simon Kemper beschreibt auf LinkedIn die Verbindung von Datacake und Slack zur Benachrichtigung bei kritischen Zuständen etc.

Unter Verwendung des TTN-internen MQTT-Servers bin ich einen anderen Weg gegangen.

Ich verwende Oxocard Connect als MQTT-Client und filtere nur die für das Monitoring erforderlichen Größen aus den Upload-Messages zur Anzeige auf dem Display.

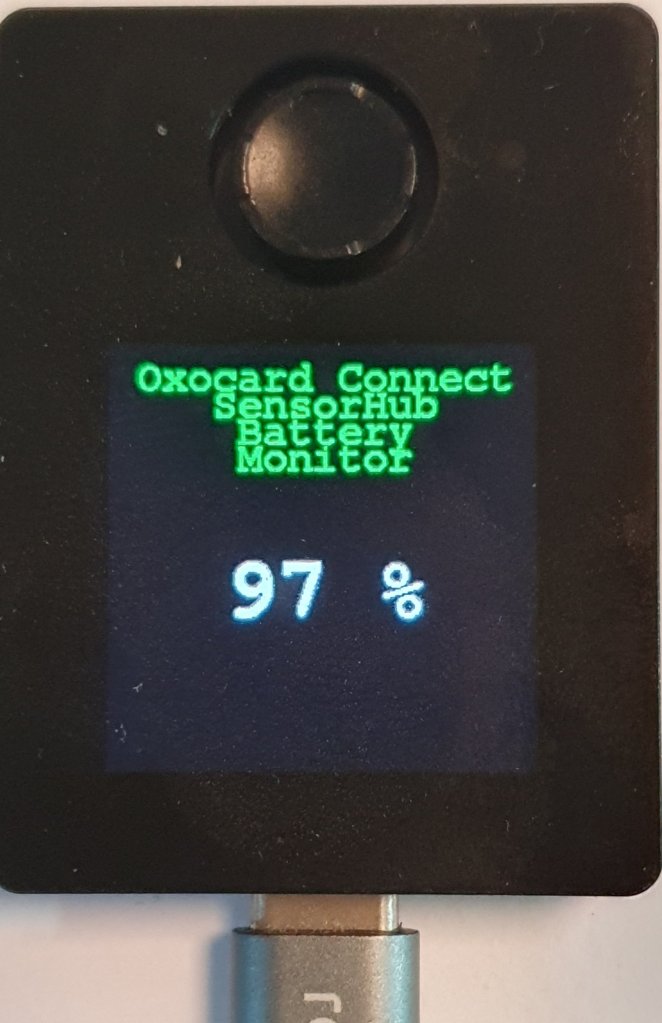
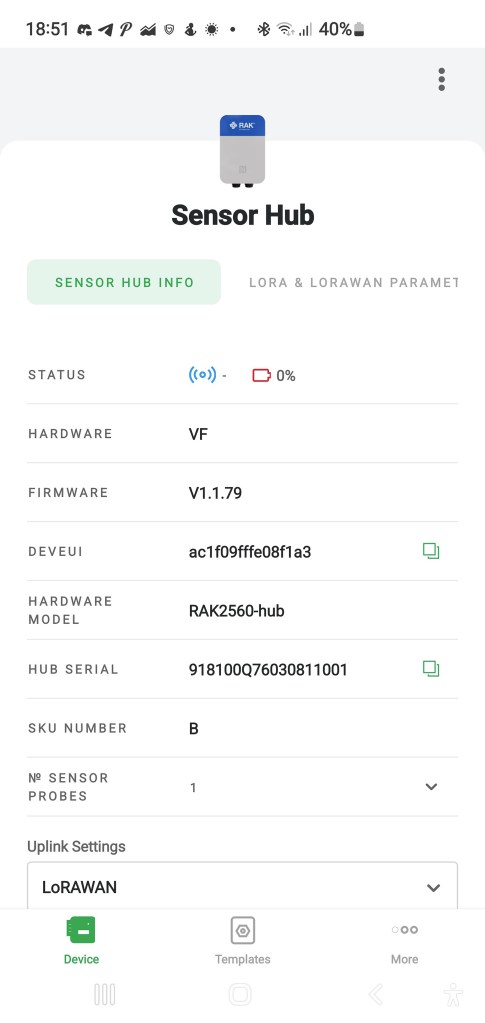
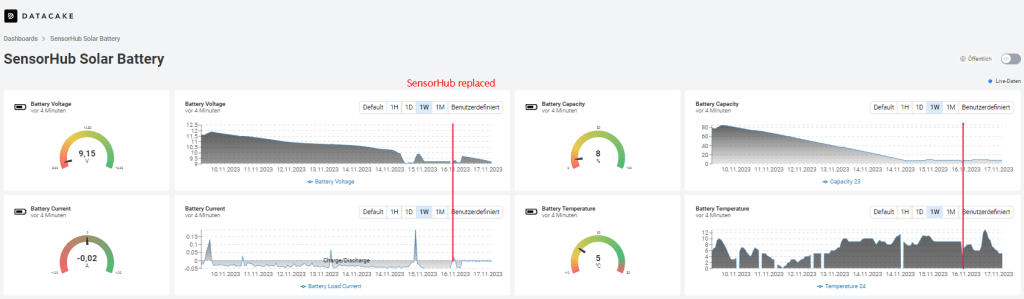
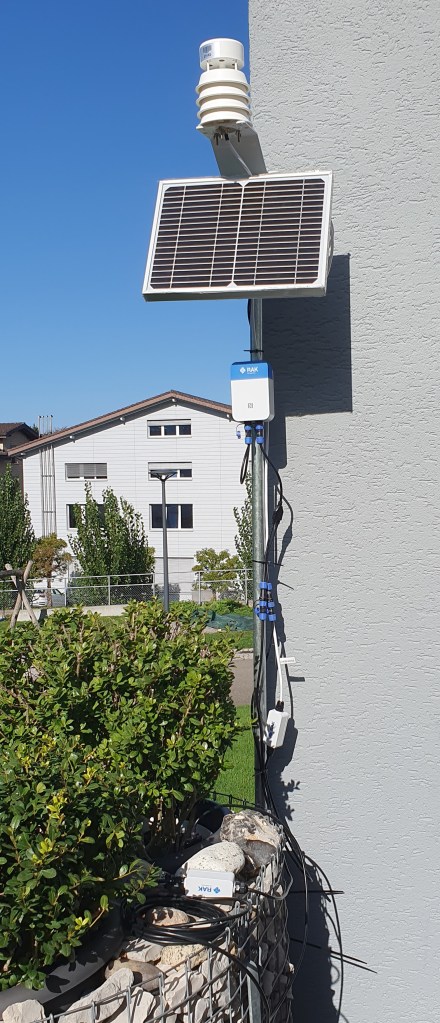
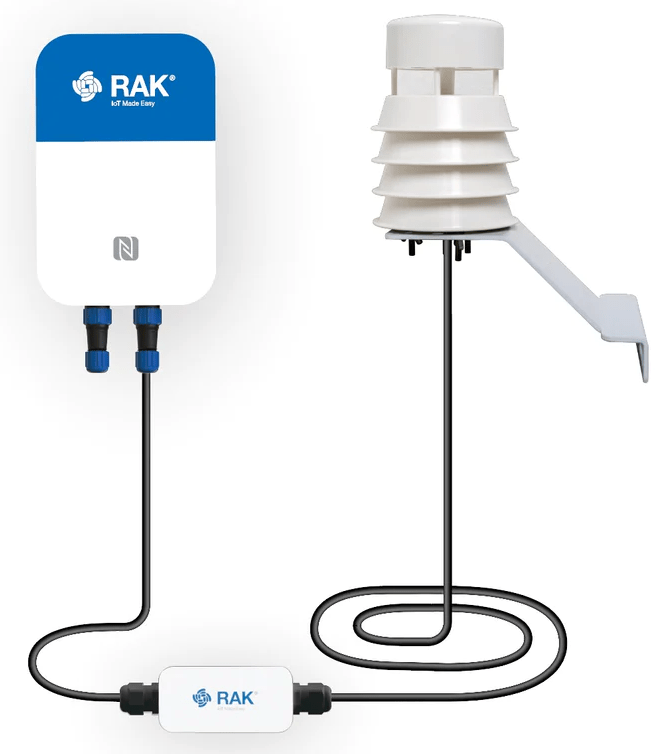
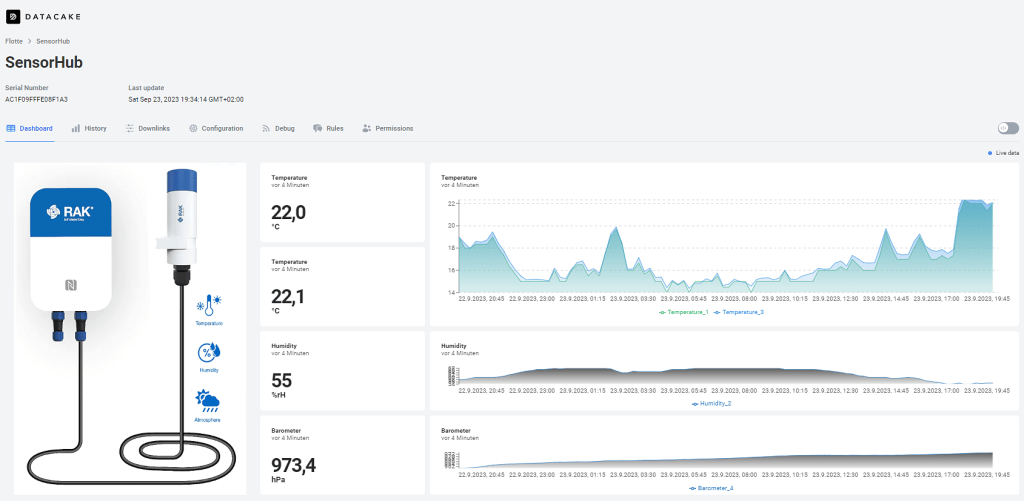
Konkret überwache ich die Batteriekapazität eines solar-gepufferten SensorHubs von RAKwireless. Gerade jetzt in der dunklen Jahreszeit möchte ich den Ladezustand der Batterie überwachen, um die Nachladung tagsüber zu verifizieren.

Der SensorHub sendet die erfassten Umweltdaten zum TTS (CE) LNS, der diese an ein Datacake Dashboard zur Visualisierung weiterleitet. Sie finden dieses Dashboard über diesen Public Link.

Der Oxocard Connect MQTT-Client „subscribed“ die Upload-Messages des SensorHubs, filtert die Batteriekapazität aus der umfangreichen Upload-Message und bringt sie auf dem Display zur Anzeige. Die Aktualisierung des Displayinhalts erfolgt mit jeder neuen Upload-Message vom SensorHub.

Ein Screenshot des Consolen Outputs zeigt die empfangene Payload vor und nach der Filterung und die Extraktion der Daten. Auf dem Display wird aber nur die aktuelle Batteriekapazität angezeigt.

Consolen Output

2023-12-01/CK

SensorHub – Reduction of Power Consumption

The power supply of the SensorHub by an RAK9154 solar battery enables the autonomous operation of the complete measuring station. I describe this in my eBook SensorHub IoT Applications.

I had to close the chapter describing this application as follows: On sunny days, recharging the battery will hardly be a problem. On cloudy days, this balance looks less favorable, and it remains to be seen whether the weather conditions in my area offer sufficiently good conditions. It is, therefore, essential that the anticipated variant of the SensorHub promises to reduce power requirements further.

I have good news today. I got a new version of SensorHub and replaced the existing one. As you can see in the screenshot of the WisToolBox app, the hardware version changed from VF zu VH and the firmware from V1.1.79 to V1.2.6.

Existing Version of SensorHub
New Version of SensorHub

The following screenshot shows the behavior of the solar battery before and after the SensorHub replacement. The weather conditions are worse over the whole period.

You can see that before the replacement of the SensorHub the current consumption was about 50 mA in the phase of discharge. After the replacement, it is reduced significantly. The same behavior can be seen in the battery capacity curve. Before the replacement, the battery capacity dropped between 10% and 20% per day without recharging.

After the replacement, the discharge remains quite small. The current consumption was about 10 mA in the phase of discharge, and the battery capacity dropped by about 1%. The weather conditions were very bad therefore, the recharging was limited to a short time.

Now, I’m waiting for a sunny day so that the solar cell can charge the battery sufficiently to survive a period of bad weather without losing the connection.

The sun came out for a few hours, and the battery was charged. During this time, the solar cell delivers a considerable charging current.

We are on the right way, as you can see, after two days with a bit of sun.


2023-11-23/CK

SensorHub IoT Applications

RAKwireless‘ SensorHub is a modular ecosystem consisting of the main body and multiple pre-configured sensor probes. With pluggable, interchangeable probes and the option to add third-party sensors to the system, the Sensor Hub is a suitable and versatile solution platform for various IoT applications where environmental monitoring is needed outdoors.

The SensorHub can work battery-powered by non-rechargeable or solar-powered batteries or with an external power supply, depending on the application and deployment location.

For data transmission into Low-Power Wide-Area Network (LPWAN), LoRaWAN is available. Alternatively, NB-IoT can be used.

As a typical low-code system, it requires configuration with the WisToolBox app from a cell phone. WisToolBox also enables access to the measured values of all connected sensors, as the following screenshots show.

The eBook SensorHub IoT Applications will be available from Amazon from November 15, 2023. Pre-orders are already possible.

This eBook introduces the SensorHub system and its usage in industrial-grade IoT applications using LoRaWAN for communication.

The first image shows a SensorHub with a connected SensorProbe equipped with WisBlock sensors. This application is suitable for powering by batteries, too.

The second image shows a SensorHub Measuring Station built by RK900-09 Weather Station, RK520-02 Soil Moisture Sensor, and RAK9154 Solar Battery. These components build an autonomous working measuring station. The measuring station was installed to test the acquisition of the measuring values via the connected sensors on the one hand and its behavior regarding solar-buffered battery operation in the darker season on the other hand.

You can access the live data at https://app.datacake.de/dashboard/d/8f0da5ea-e1f5-4da8-b951-7c19c98e0de2 and the loading situation of the solar-buffered battery at https://app.datacake.de/dashboard/d/19f2e113-74b9-4950-81be-28f9df871ae0.

This new eBook shows how to create professional IoT applications with the RAKwireless SensorHub system.

I will publish additions and further applications here in this blog.

Your queries are welcome.


2023-11-08/CK

SensorHub Measuring Station for Weather and Soil Parameters

The RK900-09 Weather Station described in my post RK900-09 Weather Station on SensorHub is the base for this SensorHub Measuring Station built by RK900-09 Weather Station, RK520-02 Soil Moisture Sensor, and RAK9154 Solar Battery. These components manufactured by RAKwireless build an autonomous working measuring station.

The measuring station was installed to test the acquisition of the measuring values via the connected sensors on the one hand and its behavior regarding battery operation in the darker season on the other hand.

The SensorHub periodically sends the measuring values to the TTN (CE) LNS. Datacake serves as a visualization platform, as the following screenshots show.

Datacake Dashboard

You can follow the acquired data on the Datacake dashboard via this Public Link.

Details of the implementation and required adaptions to the payload decoder for both platforms, as well as further hints to SensorHub, will be published in the eBook mentioned in the post RAKwireless IoT Applications.


2023-10-26/CK

Proyectos IoT para Makers

La edición española ya está disponible en Amazon.es


2023-10-26/CK

RAKwireless IoT Applications

IoT applications usually require interdisciplinary collaboration between different disciplines during development and implementation.

With WisBlock, RAKwireless created a system accompanying the entire development path to the finished device using industrial-grade yet cost-effective components. Additionally, it offers the possibility to integrate components of prototyping systems from third-party providers into WisBlock.

With these systems, you can solve various tasks. Still, many steps are necessary to get a finished device, e.g., autonomy usable as a sensor node in harsh environments, which can be tedious.

True to the philosophy „IoT Made Easy,“ RAKwireless has ensured with WisBlock that this new solution is as simple as Click – Code – Connect!

I described the WisBlock ecosystem in an eBook titled „IoT-Projects for Makers: with WisBlock from RAKwireless • just Click, Code & Connect • to the finished device.“  

You can order this eBook at Amazon https://www.amazon.com/dp/B0C8VCF4DF.

Continuing this design philosophy, based on WisBlock, RAKwireless developed the RAK2560 WisNode SensorHub.

RAKwireless SensorHub is a modular ecosystem consisting of the main body and multiple pre-configured sensor probes. With pluggable, interchangeable probes and the option to add third-party sensors to the system, the Sensor Hub is a suitable and versatile solution platform for various IoT applications where environmental monitoring is needed outdoors.

The SensorHub can work battery-powered by non-rechargeable or solar-powered batteries or with an external power supply, depending on the application and deployment location.

For data transmission into Low-Power Wide-Area Network (LPWAN), LoRaWAN is available. Alternatively, NB-IoT can be used.

As a typical low-code system, it essentially requires configuration with the WisToolBox app from a cell phone.

I am currently working on applications of SensorHub in IoT using the example of measuring environmental data.

An eBook titled
„SensorHub IoT Applications:
• with WisNode SensorHub from RAKwireless
• just configure & connect
• to the finished application.“
is in preparation.

The planned release date is 11/15/2023, and pre-orders are available on Amazon.

You can order this eBook at Amazon https://www.amazon.com/dp/B0CKFNQX4D.


2023-10-05/CK

RK900-09 Weather Station on SensorHub

The Sensor Hub equipped with a Sensor Probe containing Temperature and Humidity Sensor RAK1901 and Pressure Sensor RAK1902 was used to measure environmental data (Link).

RAKwireless offers the RK900-09 Weather Station more precise equipment for measuring weather conditions.

MEMS sensors measure temperature, humidity, barometric pressure, and ultrasonic sensors wind speed and direction. You will find the technical data on the manufacturer’s website.

The SensorProbeIO associated with the RK900-09 connects the RS-485 output of the RK900-09 to the SensorHub interface.

The payload decoder provided by RAKwireless needed minor adaptations and is available on GitHub.

For visualization, I use Datacake again and get the following data output of this Weather Station.

Datacake Dashboard

Use this QR code or public link to get the actual weather data measured by RK900-09 Weather Station connected to SensorHub.


2023-09-26/CK

The first Sensor Hub application is running…

The Sensor Hub equipped with a Sensor Probe containing Temperature and Humidity Sensor RAK1901 and Pressure Sensor RAK1902 measures environmental data and sends them to TTS (CE). Datacake provides for the Visualization.

RAKwireless Sensor Hub is an excellent example of how low-code platforms help implement IoT solutions extremely fast.


2023-09-23/CK

Meeting mit RAKwireless

Am 19.09.2023 hatte ich die Gelegenheit den CEO von RAKwireless, Ken Yu, und zwei seiner Mitarbeiter in Zürich zu treffen.

Ich konnte einen Print-Version, des als eBook konzipierten Titels zu WisBlock übergeben.

Mit dem auf WisBlock aufsetzendem SensorHub wird es weitergehen.

Hier ist der Link zu Ken’s Statement auf LinkedIn: https://www.linkedin.com/feed/update/urn:li:activity:7110136146503888896?updateEntityUrn=urn%3Ali%3Afs_feedUpdate%3A%28V2%2Curn%3Ali%3Aactivity%3A7110136146503888896%29


2023-09-21/CK

ESP32Forth – eine alternative Programmierumgebung

Für den ESP32 steht mit MicroPython eine interaktive Programmiersprache zur Verfügung. Das ist aber nicht die einzige Möglichkeit der interaktiven Programmierung, denn mit ESP32Forth steht auch eine Portierung von eForth (Arduino and eForth) für den ESP32 zur Verfügung.

Wenn Ihnen Forth unbekannt sein sollte, dann erlätert ChatGPT Ihnen FORTH wie folgt:

Die Programmiersprache FORTH ist eine ungewöhnliche und spezielle Programmiersprache, die sich von C++ und MicroPython in vielerlei Hinsicht unterscheidet, insbesondere beim Einsatz auf Mikrocontrollern. Hier sind einige der wichtigsten Eigenschaften und Unterschiede:

Eigenschaften von FORTH:

  1. Stack-basierte Sprache: FORTH verwendet einen Stapelspeicher (Stack) als zentrales Konzept. Operationen und Daten werden auf den Stapel verschoben und von dort verarbeitet. Dies macht FORTH sehr leichtgewichtig und effizient.
  2. Interaktivität: FORTH ist eine interaktive Programmiersprache. Sie können Code direkt in die FORTH-Umgebung eingeben und ausführen, was sie ideal für den schnellen Prototypenbau und das Debugging macht.
  3. Minimalistische Syntax: Die Syntax von FORTH ist extrem einfach, bestehend aus Wörtern (FORTH-Befehlen), die von Leerzeichen getrennt sind. Dies führt zu sehr kompaktem Code.
  4. Keine strikte Typisierung: FORTH ist schwach typisiert und flexibel. Dies kann sowohl ein Vor- als auch ein Nachteil sein, je nach Anwendungsfall.
  5. Direkter Hardwarezugriff: FORTH ermöglicht einen sehr direkten Zugriff auf die Hardware, was in eingebetteten Systemen nützlich sein kann.

Unterschiede zu C++:

  1. Sprachparadigma: C++ ist eine objektorientierte Programmiersprache, während FORTH als stapelbasierte Programmiersprache betrachtet wird. Dies bedeutet, dass die Herangehensweise an die Programmierung grundlegend unterschiedlich ist.
  2. Komplexität: C++ ist eine umfangreiche und komplexe Sprache mit einer Vielzahl von Funktionen und Bibliotheken. FORTH hingegen ist extrem minimalistisch und erfordert oft mehr Zeilen Code, um ähnliche Aufgaben zu erledigen.
  3. Typisierung: C++ ist stark typisiert, was bedeutet, dass Datentypen streng überprüft werden. FORTH ist schwach typisiert und erlaubt mehr Flexibilität bei der Verwendung von Daten.

Unterschiede zu MicroPython:

  1. Syntax: MicroPython ist eine Python-Variante für Mikrocontroller und verwendet eine Python-ähnliche Syntax, während FORTH seine eigene einzigartige Syntax hat.
  2. Abstraktionsebene: MicroPython bietet eine höhere Abstraktionsebene und mehr Konventionalität im Vergleich zu FORTH. Das macht MicroPython oft einfacher zu erlernen und zu verwenden.
  3. Gemeinschaft und Bibliotheken: MicroPython hat eine aktive Gemeinschaft und eine breite Palette von Bibliotheken und Modulen, die speziell für Mikrocontroller entwickelt wurden. FORTH hat weniger Ressourcen und Unterstützung in dieser Hinsicht.
  4. Entwicklungsumgebungen: MicroPython wird oft mit modernen integrierten Entwicklungsumgebungen (IDEs) verwendet, die die Entwicklung und das Debugging erleichtern. FORTH erfordert häufig eine tiefere Einarbeitung in die Arbeitsweise des Stapels und der FORTH-Umgebung.

Insgesamt hängt die Wahl zwischen FORTH, C++ und MicroPython für Mikrocontroller-Anwendungen von den spezifischen Anforderungen Ihres Projekts, Ihrer Programmierpräferenz und Ihrer Erfahrung ab. FORTH ist eine leistungsfähige, aber unkonventionelle Option, die für bestimmte Anwendungen geeignet sein kann, während C++ und MicroPython aufgrund ihrer weitverbreiteten Akzeptanz und ihrer Entwicklungsunterstützung oft bevorzugt werden.

OpenAI. (2023). ChatGPT (August 3 Version) [Large language model]. https://chat.openai.com

Wenn Sie sich mit ESP32Forth auseinandersetzen wollen, dann finden Sie die notwendigen Informationen von Installation bis hin zur Anwendung unter https://esp32.forth2020.org/ oder https://www.facebook.com/groups/esp32forth/

Ich möchte Ihnen hier zwei Beispiele zur Arbeit mit ESP32Forth zeigen, die vielleicht helfen Neugier zu wecken.

Benchmarks sind eine beliebte Vergleichsmöglichkeit für Hard- und Software. Um einen Eindruck von der Performance von ESP32Forth auf einem ESP32 zu bekommen, habe ich den DDBench(mark) herangezogen (https://theultimatebenchmark.org/).

Das Resultat des Benchmarks sind eine Laufzeit von 5.5 Sekunden.

Vergleichen Sie das Resultat mit den unter https://theultimatebenchmark.org/ veröffentlichten Daten, dann können Sie sich ein Bild von der Leistungsfähigkeit dieser Hard- und Softwarekombination machen.

Im Blogpost ESP32 ADC & DAC hatte ich die Performance des DAC-ADC-Subsystems des ESP32 untersucht.

Wenige Zeilen ESP32Forth Code ermöglichen die Ansteuerung eines DACs und das Erfassen dessen Ausgangsspannung durch einen Kanal des ADC. GPIO25 und GPIO33 werden hierzu miteinander verbunden.

( Test ESP32-DAC-ADC-Subsystem w/ ESP32Forth )

25 CONSTANT DAC1 \ GPIO25
33 CONSTANT ADC1_CH5 \ GPIO33

: wait100ms 100 ms ;
: readADC1_CH5 ADC1_CH5 adc . ;
: readADC readADC1_CH5 ;
: writeDAC1 DAC1 swap dacWrite ; ( 0-255 -- )
: test dup writeDAC1 wait100ms readADC . cr ; ( 0-255 -- )
: testloop 255 for i test next ;

Die seriellen Ausgaben habe ich geloggt, um diese für die folgenden Grafiken aufzubereiten.

Das Verhalten des analogen Subsystems entspricht den Erwartungen und ist ohne Anpassungen nur bedingt einsatzfähig.

Der einfache Test mit dieser interaktiven Programmierumgebungen wird aber deutlich.


2023-09-14/CK